How we impact
act PROSPERI.AI
Act Digital Corporate Artificial Intelligence
Solutions
Services
Partners
In the world of Cloud Computing, efficiently deploying and managing web resources is key. This article dives into setting up a website hosted on Amazon S3 (Simple Storage Service), served through Amazon CloudFront, using Terraform, a popular Infrastructure as Code (IaC) tool. But first, let’s break down the core concepts.
Amazon Web Services (AWS) is a comprehensive and broadly adopted cloud platform that offers over 200 fully featured services from data centers globally. AWS provides a variety of services including computing power, storage options, and networking capabilities, all of which contribute to the flexibility and scalability of cloud resources.
An Amazon S3 bucket is a public cloud storage resource available in the AWS S3 service. Like file folders, buckets are used to store objects, which consist of data and descriptive metadata. S3, renowned for its scalability and data availability, is commonly used for backup and recovery, data archiving, and web hosting.
Amazon CloudFront is a fast content delivery network (CDN) service that securely delivers data, videos, applications, and APIs to customers globally with low latency and high transfer speed. CloudFront works seamlessly with AWS services, like S3, to accelerate the delivery of static and dynamic web content.
Terraform, by HashiCorp, is an Infrastructure as Code software tool that enables you to create, change, and improve infrastructure safely and predictably. It manages cloud services through declarative configuration files, making it an essential tool for modern cloud infrastructure.
Terraform stands out in the realm of IaC for its unique approach to managing and provisioning resources. At its core, Terraform operates based on two fundamental principles: idempotency and state management. Understanding how Terraform works and the role of the “terraform.tfstate” file is key to appreciating its power and capabilities.
Terraform uses a declarative approach, where you define the desired state of your infrastructure in configuration files. Here’s a brief overview of its operation:
The “terraform.tfstate” file is pivotal in how Terraform tracks the state of your infrastructure:
Before diving into the deployment process, it’s essential to understand the unique attributes of Terraform that make it an indispensable tool for modern infrastructure management, especially in our context of deploying a website on AWS.
Idempotency: reliable and consistent infrastructure
One of Terraform’s key features is its idempotency, which ensures that running the same configuration multiple times results in the same state, without creating unnecessary changes or duplications. This property is crucial for maintaining consistency and reliability in infrastructure management:
Agnosticism: multi-cloud and multi-service
Terraform is cloud-agnostic, meaning it can manage resources across multiple cloud providers, as well as on-premises infrastructure:
Powerful in change management
Terraform’s ability to manage and apply changes incrementally is particularly powerful. In the context of our website deployment:
Integration with CI/CD
The true strength of Terraform in a modern DevOps environment is its compatibility with Continuous Integration and Continuous Deployment (CI/CD) pipelines:
Before diving into the steps of deploying a website with Terraform on AWS, we need to set up secure and efficient communication between Terraform and AWS. This process ensures that Terraform can manage AWS resources effectively while adhering to best security practices.
Creating a dedicated IAM user
To begin with, it's crucial to create a dedicated AWS Identity and Access Management (IAM) user specifically for Terraform. This user, which we can name “tf_s3_cloudfront”, will have permissions tailored to the resources Terraform will manage:
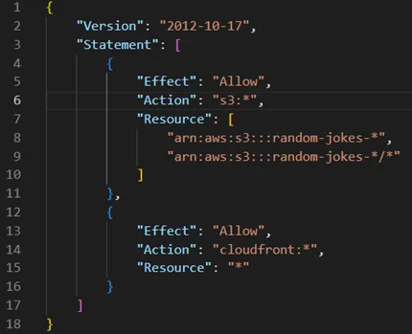
Configuring the IAM policy
The IAM policy for “tf_s3_cloudfront” should be as restrictive as possible while still allowing Terraform to perform required actions. Based on your requirements, the policy should include permissions for S3 and CloudFront:
Handling AWS credentials securely
After setting up the IAM user, securely managing the AWS credentials (Access Key ID and Secret Access Key) is paramount:
The importance of security and least privilege
Adhering to security best practices and the principle of least privilege is crucial in cloud infrastructure management:
By following these steps, you ensure that Terraform interacts with AWS securely and efficiently, paving the way to the safe and effective deployment of your website.
With security foundations firmly in place, we can now proceed to the steps of deploying a website on AWS using Terraform, confident in the knowledge that our infrastructure is not only efficient, but also secure and compliant with best practices.
Now, let’s explore the steps to upload a website to AWS S3 and set it as the origin of a CloudFront distribution using Terraform.
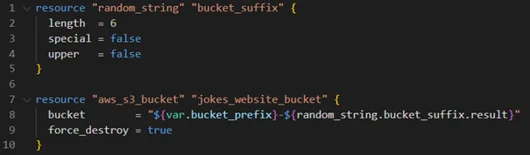
Begin by writing Terraform configuration files that define the required AWS resources. This involves creating “main.tf”, “variables.tf”, “provider.tf”, and other necessary configuration files:
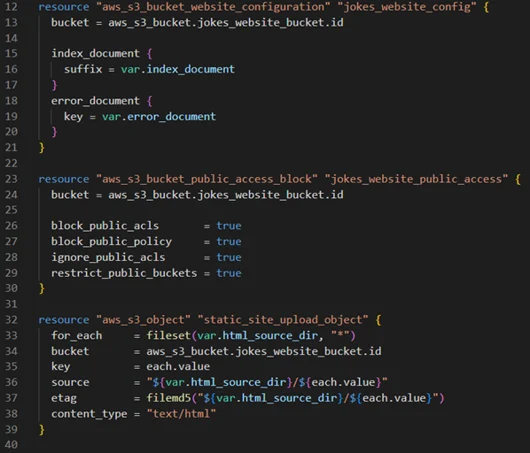
Define an S3 bucket in Terraform to store your website files. Enable website hosting on the bucket and configure public access settings according to your needs.
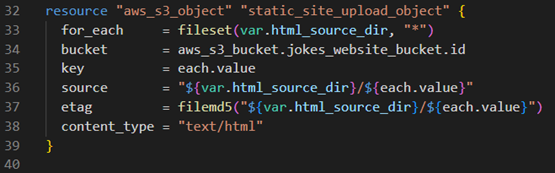
Upload your website's static files (e.g., HTML, CSS, JavaScript) to the S3 bucket using the “aws_s3_object” resource. This step involves specifying the file path and ensuring the correct content type is set.
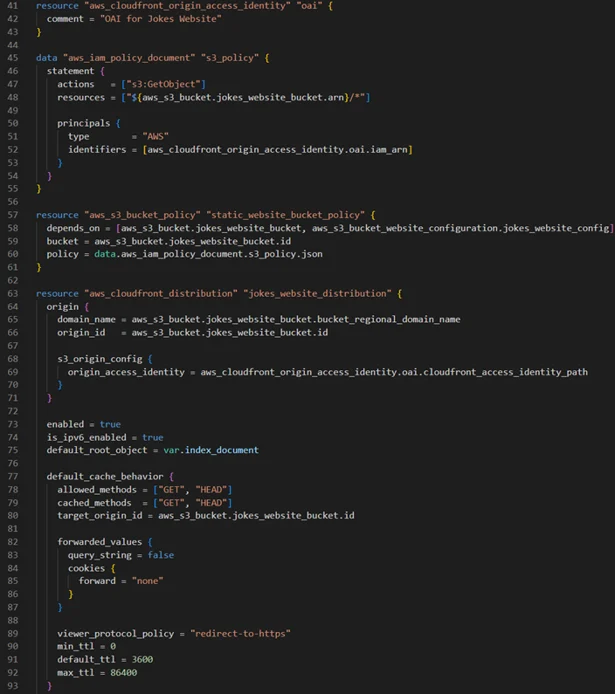
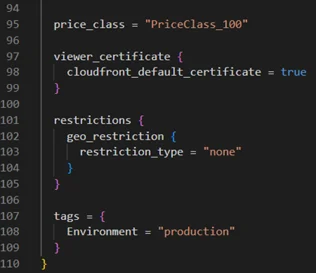
Create a CloudFront distribution with your S3 bucket as the origin. This involves defining a CloudFront distribution resource, configuring origin access identity (OAI), and setting cache behaviours.
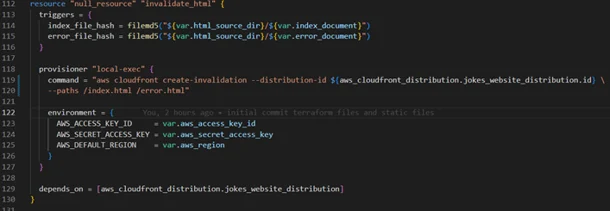
Implement cache invalidation to ensure updates to your website are reflected promptly. This can be achieved using a “null_resource” with a local-exec provisioner in Terraform.
Having explored the implementation of the main configuration, let’s show the role of variables in Terraform.
Variables in Terraform act as customisable parameters, making our infrastructure configurations more adaptable and easier to modify. Defined in the “variables.tf” file, these variables can be assigned and altered without changing the core logic of our Terraform scripts.
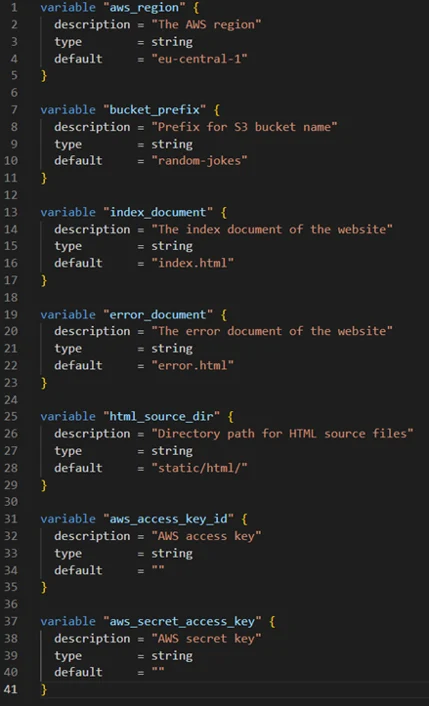
By leveraging these variables, we can easily customise our AWS resources, such as specifying the region for our CloudFront distribution or setting a prefix for our S3 bucket names.
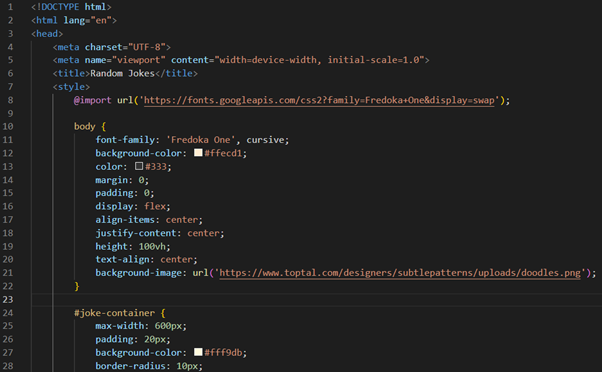
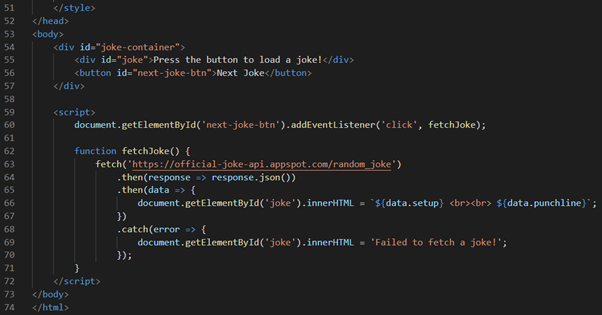
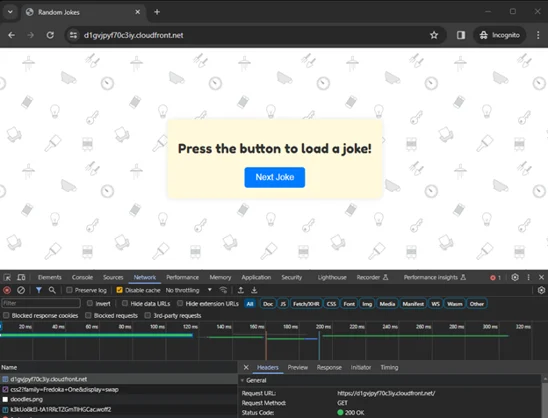
In our demonstration here, the key focus is deploying the “index.html” file, which serves as the entry point for our static website hosted on AWS S3 and distributed via CloudFront. Understanding the structure and best practices behind this setup is crucial.
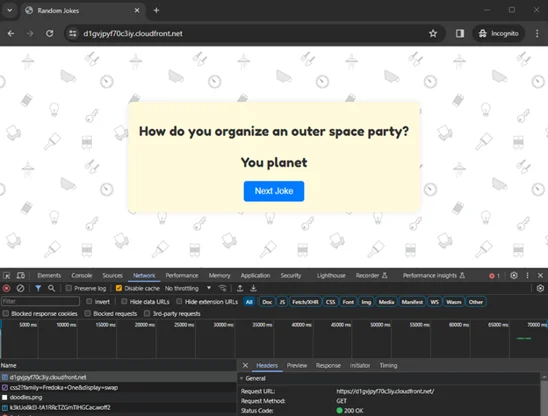
The provided “index.html” is a well-structured web page designed to display “random jokes”. Let's break down its key components.
HTML structure
Head section
Internal CSS styles
<style>: contains CSS styles used to style the HTML content. This includes:
Body section
JavaScript for dynamic content
This “index.html” file is an excellent example of a simple yet interactive web page. It combines HTML structure, CSS styling, and JavaScript functionality to create a user-friendly experience where visitors can enjoy a new joke with each button click. The use of external APIs for dynamic content and responsive design principles makes it a modern and engaging webpage.
In our Terraform setup, this file is strategically placed in the “static/html” directory to keep our project organised and to streamline the deployment process to AWS S3 and CloudFront.
We place the “index.html” file inside the “static/html” directory. This structure is a best practice for a few reasons:
Using Terraform, we automate the deployment of the “index.html” file to the S3 bucket. Here’s a snippet of the Terraform configuration that accomplishes this:
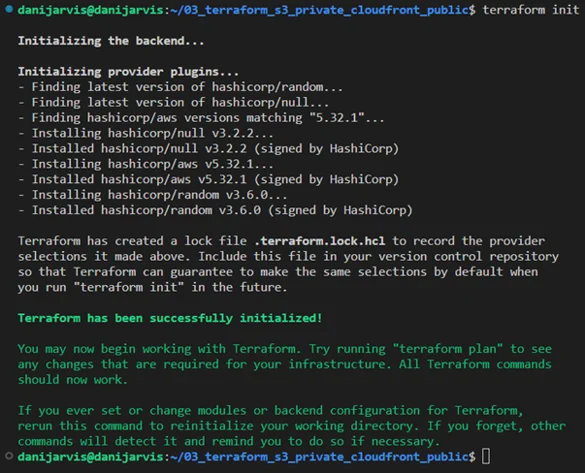
1. Running “terraform init”: initialising Terraform to download necessary plugins and set up the environment.
2. Executing “terraform plan”: outlining the changes Terraform will make to your AWS infrastructure.
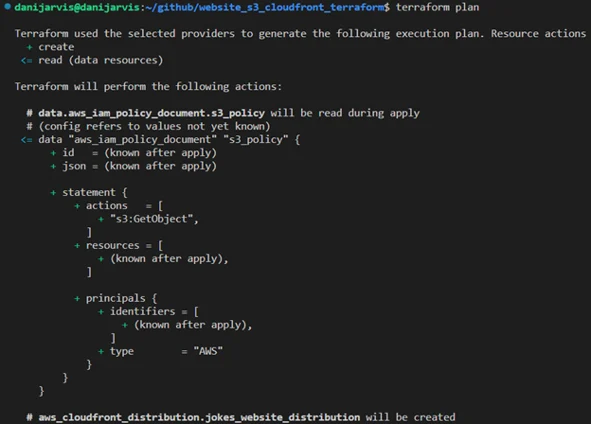
Interpreting Terraform’s plan output
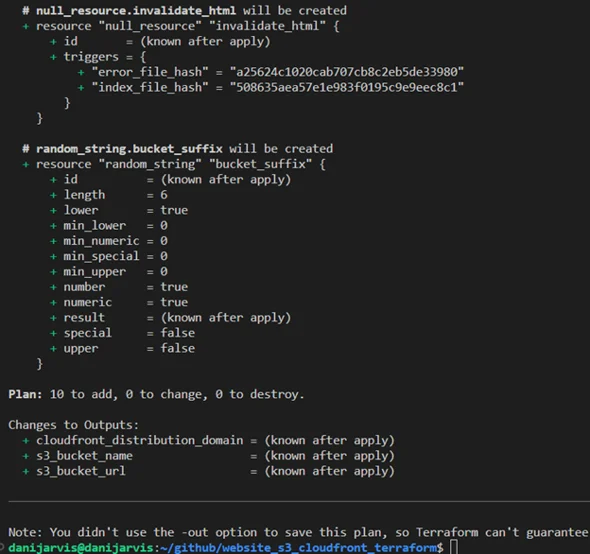
A critical step is running “terraform plan”. This command provides an overview of the actions Terraform will perform when applying your configuration. Let's dissect a typical output you might encounter.
Plan: 10 to add, 0 to change, 0 to destroy
This output can be broken down as follows:
Importance of the plan output
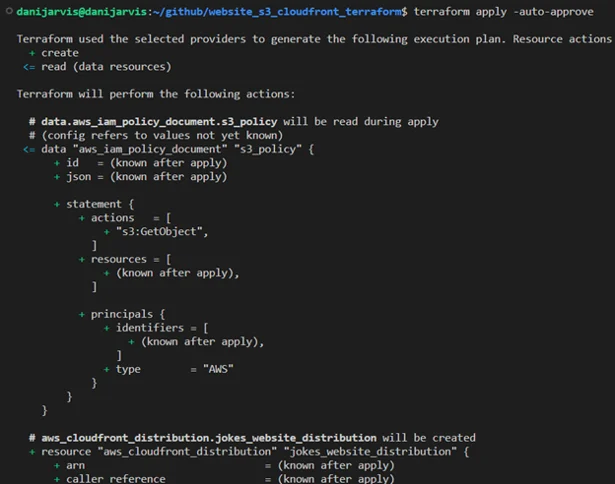
3. Applying with “terraform apply”: applying the changes to deploy the “index.html” to the S3 bucket and configure CloudFront.
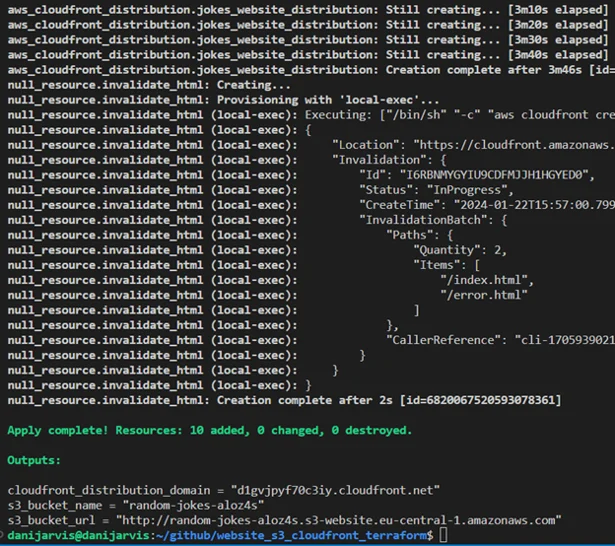
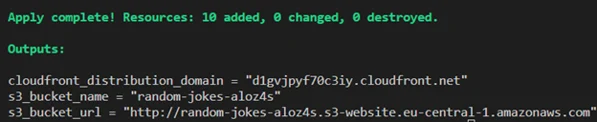
After running “terraform apply”, Terraform provides output variables that give important information about the resources it has created or modified. Let's dissect the output from our Terraform execution and understand how to test our website in a browser.
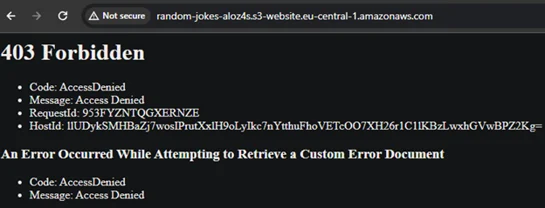
Also, as you can see, we can’t access the S3 bucket URL. Intentionally, it’s blocked to the outside world and you will receive an “access denied” message. In our code, only CloudFront can reach the content into the S3 as origin.
Let's see how updates to your website are handled:
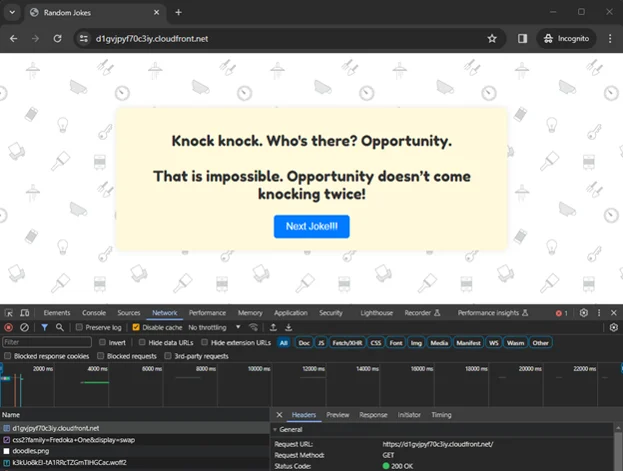
To illustrate this, I’m going to change the “index.html” in the text of the button “Next Joke” – I’ll add exclamations marks !!!
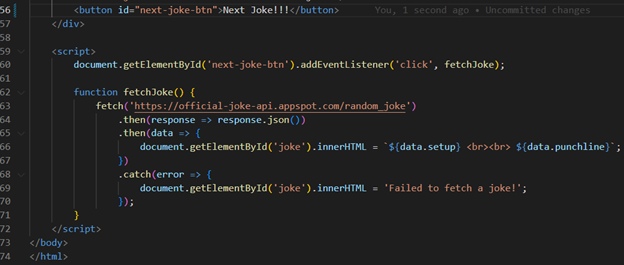
As you may notice, we can see the change after using the “terraform apply” command in the output. Also, Terraform itself manages cache invalidation to see our change in the browser:

If you would like to try this IaC project yourself, you can access the complete Terraform code on my GitHub. Simply clone the repository and follow the instructions in the README.md file to set up your own static website on AWS S3 with CloudFront.
By using this repository as a starting point, you can quickly deploy and manage your static websites on AWS with Terraform. Don't forget to review and adapt the code to your specific requirements.
Happy coding!
As Cloud Computing continues to evolve, tools like Terraform become indispensable for developers and engineers. They not only simplify the complexities associated with cloud infrastructure, but also ensure that these infrastructures are robust, secure, and agile. This guide serves as a testament to Terraform's capabilities, providing a blueprint for efficient and secure cloud-based web hosting.
Whether you're an experienced cloud professional or new to cloud infrastructure, the insights and practices outlined in this article offer valuable knowledge for leveraging AWS and Terraform to their fullest potential. The journey from setting up an AWS user with specific IAM policies to seeing a live website highlights the transformative power of combining AWS services with Terraform's automation process.
As we look towards future advancements in cloud technology, the integration of these tools and principles will undoubtedly play a key role in shaping efficient, secure, and scalable digital landscapes.
In the world of Cloud Computing, efficiently deploying and managing web resources is key. This article dives into setting up a website hosted on Amazon S3 (Simple Storage Service), served through Amazon CloudFront, using Terraform, a popular Infrastructure as Code (IaC) tool. But first, let’s break down the core concepts.
Amazon Web Services (AWS) is a comprehensive and broadly adopted cloud platform that offers over 200 fully featured services from data centers globally. AWS provides a variety of services including computing power, storage options, and networking capabilities, all of which contribute to the flexibility and scalability of cloud resources.
An Amazon S3 bucket is a public cloud storage resource available in the AWS S3 service. Like file folders, buckets are used to store objects, which consist of data and descriptive metadata. S3, renowned for its scalability and data availability, is commonly used for backup and recovery, data archiving, and web hosting.
Amazon CloudFront is a fast content delivery network (CDN) service that securely delivers data, videos, applications, and APIs to customers globally with low latency and high transfer speed. CloudFront works seamlessly with AWS services, like S3, to accelerate the delivery of static and dynamic web content.
Terraform, by HashiCorp, is an Infrastructure as Code software tool that enables you to create, change, and improve infrastructure safely and predictably. It manages cloud services through declarative configuration files, making it an essential tool for modern cloud infrastructure.
Terraform stands out in the realm of IaC for its unique approach to managing and provisioning resources. At its core, Terraform operates based on two fundamental principles: idempotency and state management. Understanding how Terraform works and the role of the “terraform.tfstate” file is key to appreciating its power and capabilities.
Terraform uses a declarative approach, where you define the desired state of your infrastructure in configuration files. Here’s a brief overview of its operation:
The “terraform.tfstate” file is pivotal in how Terraform tracks the state of your infrastructure:
Before diving into the deployment process, it’s essential to understand the unique attributes of Terraform that make it an indispensable tool for modern infrastructure management, especially in our context of deploying a website on AWS.
Idempotency: reliable and consistent infrastructure
One of Terraform’s key features is its idempotency, which ensures that running the same configuration multiple times results in the same state, without creating unnecessary changes or duplications. This property is crucial for maintaining consistency and reliability in infrastructure management:
Agnosticism: multi-cloud and multi-service
Terraform is cloud-agnostic, meaning it can manage resources across multiple cloud providers, as well as on-premises infrastructure:
Powerful in change management
Terraform’s ability to manage and apply changes incrementally is particularly powerful. In the context of our website deployment:
Integration with CI/CD
The true strength of Terraform in a modern DevOps environment is its compatibility with Continuous Integration and Continuous Deployment (CI/CD) pipelines:
Before diving into the steps of deploying a website with Terraform on AWS, we need to set up secure and efficient communication between Terraform and AWS. This process ensures that Terraform can manage AWS resources effectively while adhering to best security practices.
Creating a dedicated IAM user
To begin with, it's crucial to create a dedicated AWS Identity and Access Management (IAM) user specifically for Terraform. This user, which we can name “tf_s3_cloudfront”, will have permissions tailored to the resources Terraform will manage:
Configuring the IAM policy
The IAM policy for “tf_s3_cloudfront” should be as restrictive as possible while still allowing Terraform to perform required actions. Based on your requirements, the policy should include permissions for S3 and CloudFront:
Handling AWS credentials securely
After setting up the IAM user, securely managing the AWS credentials (Access Key ID and Secret Access Key) is paramount:
The importance of security and least privilege
Adhering to security best practices and the principle of least privilege is crucial in cloud infrastructure management:
By following these steps, you ensure that Terraform interacts with AWS securely and efficiently, paving the way to the safe and effective deployment of your website.
With security foundations firmly in place, we can now proceed to the steps of deploying a website on AWS using Terraform, confident in the knowledge that our infrastructure is not only efficient, but also secure and compliant with best practices.
Now, let’s explore the steps to upload a website to AWS S3 and set it as the origin of a CloudFront distribution using Terraform.
Begin by writing Terraform configuration files that define the required AWS resources. This involves creating “main.tf”, “variables.tf”, “provider.tf”, and other necessary configuration files:
Define an S3 bucket in Terraform to store your website files. Enable website hosting on the bucket and configure public access settings according to your needs.
Upload your website's static files (e.g., HTML, CSS, JavaScript) to the S3 bucket using the “aws_s3_object” resource. This step involves specifying the file path and ensuring the correct content type is set.
Create a CloudFront distribution with your S3 bucket as the origin. This involves defining a CloudFront distribution resource, configuring origin access identity (OAI), and setting cache behaviours.
Implement cache invalidation to ensure updates to your website are reflected promptly. This can be achieved using a “null_resource” with a local-exec provisioner in Terraform.
Having explored the implementation of the main configuration, let’s show the role of variables in Terraform.
Variables in Terraform act as customisable parameters, making our infrastructure configurations more adaptable and easier to modify. Defined in the “variables.tf” file, these variables can be assigned and altered without changing the core logic of our Terraform scripts.
By leveraging these variables, we can easily customise our AWS resources, such as specifying the region for our CloudFront distribution or setting a prefix for our S3 bucket names.
In our demonstration here, the key focus is deploying the “index.html” file, which serves as the entry point for our static website hosted on AWS S3 and distributed via CloudFront. Understanding the structure and best practices behind this setup is crucial.
The provided “index.html” is a well-structured web page designed to display “random jokes”. Let's break down its key components.
HTML structure
Head section
Internal CSS styles
<style>: contains CSS styles used to style the HTML content. This includes:
Body section
JavaScript for dynamic content
This “index.html” file is an excellent example of a simple yet interactive web page. It combines HTML structure, CSS styling, and JavaScript functionality to create a user-friendly experience where visitors can enjoy a new joke with each button click. The use of external APIs for dynamic content and responsive design principles makes it a modern and engaging webpage.
In our Terraform setup, this file is strategically placed in the “static/html” directory to keep our project organised and to streamline the deployment process to AWS S3 and CloudFront.
We place the “index.html” file inside the “static/html” directory. This structure is a best practice for a few reasons:
Using Terraform, we automate the deployment of the “index.html” file to the S3 bucket. Here’s a snippet of the Terraform configuration that accomplishes this:
1. Running “terraform init”: initialising Terraform to download necessary plugins and set up the environment.
2. Executing “terraform plan”: outlining the changes Terraform will make to your AWS infrastructure.
Interpreting Terraform’s plan output
A critical step is running “terraform plan”. This command provides an overview of the actions Terraform will perform when applying your configuration. Let's dissect a typical output you might encounter.
Plan: 10 to add, 0 to change, 0 to destroy
This output can be broken down as follows:
Importance of the plan output
3. Applying with “terraform apply”: applying the changes to deploy the “index.html” to the S3 bucket and configure CloudFront.
After running “terraform apply”, Terraform provides output variables that give important information about the resources it has created or modified. Let's dissect the output from our Terraform execution and understand how to test our website in a browser.
Also, as you can see, we can’t access the S3 bucket URL. Intentionally, it’s blocked to the outside world and you will receive an “access denied” message. In our code, only CloudFront can reach the content into the S3 as origin.
Let's see how updates to your website are handled:
To illustrate this, I’m going to change the “index.html” in the text of the button “Next Joke” – I’ll add exclamations marks !!!
As you may notice, we can see the change after using the “terraform apply” command in the output. Also, Terraform itself manages cache invalidation to see our change in the browser:
If you would like to try this IaC project yourself, you can access the complete Terraform code on my GitHub. Simply clone the repository and follow the instructions in the README.md file to set up your own static website on AWS S3 with CloudFront.
By using this repository as a starting point, you can quickly deploy and manage your static websites on AWS with Terraform. Don't forget to review and adapt the code to your specific requirements.
Happy coding!
As Cloud Computing continues to evolve, tools like Terraform become indispensable for developers and engineers. They not only simplify the complexities associated with cloud infrastructure, but also ensure that these infrastructures are robust, secure, and agile. This guide serves as a testament to Terraform's capabilities, providing a blueprint for efficient and secure cloud-based web hosting.
Whether you're an experienced cloud professional or new to cloud infrastructure, the insights and practices outlined in this article offer valuable knowledge for leveraging AWS and Terraform to their fullest potential. The journey from setting up an AWS user with specific IAM policies to seeing a live website highlights the transformative power of combining AWS services with Terraform's automation process.
As we look towards future advancements in cloud technology, the integration of these tools and principles will undoubtedly play a key role in shaping efficient, secure, and scalable digital landscapes.